Inspection Panels for Your Wheelwells
![]()
Inspection Panels for Your Wheelwells |
|
by Steve Wilkinson
|
From Falco Builders Letter, September 1992 |
This modification is guaranteed to increase your airspeed by not one single knano-knot. But if, like me, you're only happy when you're working on your airplane, it'll give you something to do and postpone briefly that dreadful day when your Falco is utterly, completely, totally finished. And it's harmless enough that management doesn't mind if you perform this modification.
At least two builders-Jim DeAngelo and I-have, after our airplanes were "finished" and flying, been forced to gain access to a universal joint securing a main-gear jackscrew to the retraction-system gearbox. Each of us bent a jackscrew during a confrontation with a crosswind, and each of us had to remove that jackscrew for replacement (Jim) or repair (me). At least DeAngelo bent it on landing, which is the more demanding maneuver; I botched the takeoff.
It should be added that the cause of our bent jackscrews was not some fault in the gear-retraction system but the fact that apparently, neither Jim's nor my gear-extension downlocks were going fully over center; neither would pass the Scott "kick test." (Look for the drawing of the small Army boot on your landing-gear system blueprint, and you'll see what I mean.)
In my case, and I assume Jim's as well, the malfunction meant cutting away enough of the inboard wheelwell skin to get at the universal joint with a device to drive out the taper pin. (See diagram.) Once I'd carved away with my utility knife-the skin is only 1mm plywood-I realized that it would be nice to not only have permanent access to the "utility tunnel" through which all the fore-and-aft wiring and hoses run, but to fabricate a device that would seal the holes through which the main-gear jackscrews pass. Those holes are sources of chilly air leakage in winter, and I've always thought it a bit inelegant that dreck from puddles and whatnot might get splashed up into the airframe-into the "utility tunnel"-through those open holes.
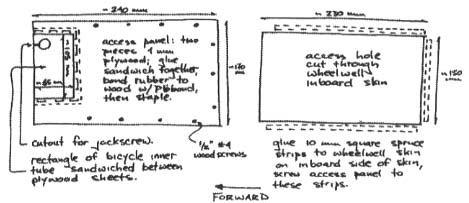
So I made a pair of inspection panels with rubber seals intended to accommodate the slight vertical motion of the jackscrew as the gear retracts yet seal the holes against the ingress of dirt and water during taxi, takeoff or landing. The panels can be removed at any time you want to retrieve loose change, missing tools or fried wires from the utility tunnel.
Each inspection panel-one for each wheelwell-consists of two pieces of 1mm plywood sandwiching between them a rectangle of rubber through which the jackscrew passes. Bicycle inner-tube rubber seemed to me just the right thickness, but then I'm a bikie anyway. These panels are then secured with small roundhead wood screws to strips of 10mm spruce glued to the inside-i.e. inboard-of the remaining wheelwell skin, and because the rubber gasket is slit through on one side (see diagram), the panels can be removed and replaced without affecting the jackscrew. Admittedly, I only had to deal with the flat-walled wheelwells designed to accommodate wheelwell doors; for those of you who have open wheelwells with curved interior skin, it's be more of a challenge, but certainly not a terminal difficulty.
It's important to make the rubber gasket large enough to accommodate the linkage that actuates the wheelwell door, since in the fully retracted position, that linkage flattens into an extreme 'vee' and extends into a position slightly inboard of the wheelwell skin. So it needs to come up against bike-tube rubber rather that wood. (It's another reason why you should use relatively thin rubber for the gasket, so it doesn't resist the retraction of the door linkage.) Don't assume the measurements shown on the diagram will automatically be right for your airplane; there may be minor differences between our airplanes-I know, I know, there shouldn't be, but this is the Real World-so you should make a cardboard template before cutting wood.
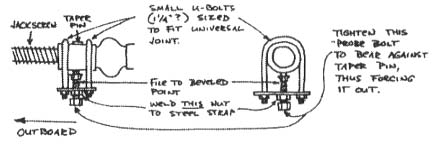
If you ever do have to remove/repair/replace a landing-gear jackscrew, driving out the taper pin that secures the screw to the universal joint will be the biggest challenge. A simple device fabricated with the help of basic items that all Falco builders have in their kitchens, such as small U-bolts, steel plate and welding torches, will ease the pain, but you may still have to do a certain amount of rapping, banging, knuckle-skinning and Mouse Milk-applying.
The diagram below should tell you how to make and use the thing. Once you've got it made, to coin a phrase, mount it in place on the universal joint, after slacking off the jam-nut that secures the taper pin, and locate the "probe bolt" of the device in the center of the slacked-off nut. (Don't remove the nut completely, for it helps to retain the probe in place as you apply pressure to the taper pin.) Then slowly wrench away on the bolthead of the probe, and one of two things will happen: (1) The taper pin will pop loose, or (2) the cute little tool you've just made will terminally deform because the taper pin isn't going anywhere.
If you find yourself in situation #2, administer Mouse Milk, sharp raps to the probe bolt with a mallet and socket-wrench extension, or -- in extremis -- heat. Of course, you'll probably set your Falco on fire, but so what? Then you'd get the chance to build another one.
Confused overseas Falco builders should not attempt to massage the teats of pregnant mice -- Mouse Milk is a trade name of a common penetrating oil. There are other brands as well; Nuts Off, Liquid Wrench are only two. -- Alfred Scott |
![]()