Rigging the Landing Gear Retraction System
![]()
Rigging the Landing Gear Retraction System |
|
| This page describes the procedure for rigging the Falco landing gear retraction system. We've provided this in response to a request from Boca Aviation, which is presently working on a Falco. |
General Description
The landing gear retraction system of the F.8L Falco has three
screwjacks with raise and lower the tricycle landing gear system
of the airplane. The screwjacks are operated by a single electric
gearmotor located between the seats, and an emergency hand crank
is provided to drive the system in the event of a system failure.
Each screwjack has a fitting on the outboard end (in the case of the main gear) or the forward end (in the case of the nose gear). The fitting contains a spring with a stroke of 10mm. The intention of the design is that all three screwjacks should arrive at the gear-down position at the same time, and then the motor will continue to turn so that the spring is compressed to some degree. The springs are provided to accommodate the expansion and contraction of the airframe.
The fittings on the end of the screwjacks are installed with a cross-bolt, which runs in a slot in the fitting and which determines the 10mm length of the stroke. The nuts on these cross-bolts should be tightened to finger-tight and then backed off one-half of a turn, to insure that the fittings can move easily and compress the spring.
| The cross-bolts should never be torqued down and tightened like a normal airframe bolt as this would prevent the springs from compressing and prevent the system from operating properly. |
Over-Center Struts
The side load struts for the main landing gear and the upper
and lower drag struts of the nose gear are intended to go slightly
over-center so that once the gear is down and the springs press
and hold the struts in the over-center position, pressure from
the landing gear will make the over-center struts lock more tightly
and resist any pressure.
Rigging the Main Gear Screwjacks
Install the main gear screwjacks so that each screwjack arrives
at the gear-down position at the same time.
Rigging the Nose Gear Screwjack
First, crank the main gear down so that the screwjacks are fully
extended but not yet pushing on the springs. The best thing to
do is to take the nuts off the bolts and turn the crank until
you can just slide the bolt in.
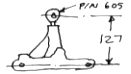
Second, adjust the height of P/N 605 Nose Gear Adjustment Screw to a height of 127mm as shown in the sketch below right.
Third, screw the nose gear screwjack into the screwjack sleeve. Install the rod end fitting and spring, and then bolt all of that to the nose gear adjustment screw. Turn the screw out until it fits into the universal joint. Then drill for the taper pin to fix the screw in place. This will properly synchronize the system.
Adjusting the Gear Down Limit Switch
Adjust the Gear-Down Limit Switch so that the landing gear motor
will lower the landing gear and shut the motor off so that all
three screwjacks will compress the springs in the fittings on
the end of the screwjack.
There is no particular requirement for the amount of the spring compression, but a good goal is that the springs should be about halfway compressed, i.e. about five millimeters of the 10mm stroke.
|
|
![]()