Fixing a Fuel-Tank Leak
![]()
Fixing a Fuel-Tank Leak |
|
by Stephan Wilkinson
|
This article appeared in the September 1996 Falco Builders Letter |
There's nothing that brings me nearer tears than the weeping blue stain of a microscopic but intractable leak in my Falco's fuel tanks. It has happened several times now, and my attempts to correct it have ranged from total removal and replacement of the offending tank to the application of PRC, an evil-smelling, rubbery, sticky, two-part tank sealant that supposedly can seal a leak from the outside. Neither approach worked. (Admittedly, the front tank that I replaced was one that had initially been used by Sequoia in some of the stress-testing that led to the adoption of the stiffening channels on the current tanks, but even the replacement tank eventually sprang a couple of pinhole leaks.)
Then somebody on Compuserve's Avsig electronic bulletin board told me about a remedy called AeroSeal, sold by a Mooney owner in Florida named Norm Smith and STCed for the in situ treatment of welded-aluminum tank leaks in Mooneys. So I faxed an inquiry to Smith's company, Aero-Trim, and at 0830 the next morning, my phone woke me up. It was Smith, calling from Florida.
"Jeez," I thought to myself fuzzily, "how does he make any money answering every inquiry by long-distance phone?" Smith enthusiastically touted the virtues of his product and explained that you simply created a slight vacuum in the offending tank, sprayed the "stuff" on the leak from the outside and let it be sucked into the leak, where it hardened. I liked that feature, since one of my leaks was under a tank-stiffening bracket, in a location that I couldn't possibly reach or even clean for the application of standard external sealant. But I could spray it, and an aerosol mist would find the sucking leak. (Not a misprint. That's supposed to be an s.)
Smith carefully explained that his AeroSeal only worked for the tiniest of leaks-.005 inches in size or less, which meant not dripping or running but simply exuding enough gasoline to leave the telltale blue stain and an unmistakable odor. That sounded like exactly what I had, so I said, "Great. Send me some. How much is it?"
"Five-sixty," Smith said. "That'll be enough to do at least two tanks."
"Only $5.60? That won't even pay for your phone call."
"No, $560," Smith explained.
"Uh, yeah, right. That's what I meant," I stammered, suddenly embarrassed to be unmasked as a two-bit player who shopped at Pep Boys rather than Million Aire.
But Smith gave me a break: he sent me "half a kit," for $280. When it arrived, the half-kit was revealed to consist of two pint-size pump-spray bottles each containing about enough liquid to fill a plastic 35mm film container. One of the liquids was labeled "AeroSolv," and by its smell appeared to be about 15 cents worth of trichlorethane cleaning fluid-an excellent but common solvent with which to clean the tank leaks before applying the AeroSeal.
But what was in the AeroSeal bottle? The only clue was the label, "contains methacrylate ester." Hmmmm. A variation on Krazy Glue, which is a cyanoacrylate ester. But methacrylate ester I'd also heard of: it's the main component of a wide variety of Loctite threadlockers and sealants, and I began to suspect that what I'd bought was a small quantity of something very much like classic Loctite 290 Threadlocker with an astronomical markup. (Loctite 290 is dyed green and AeroSeal is relatively clear, so they obviously aren't identical. But the fact is that 290 costs about $12 an ounce retail, and Smith sells replacement quantities of AeroSeal for $93 an ounce.)
Anaerobics such as cyano- and methacrylate esters become adhesive and hard in the absence of oxygen, which is why Krazy Glue will stick your fingers together or to anything you touch. The glue is harmless until you contact something-or yourself-and the touch seals out the air. Presto, the model airplane builder's affliction, welded skin. (Particularly embarrassing when it happens during a nose-picking episode.)
An "anaerobic" condition also exists in the minute interstices of a bolt or nut's threads, or in a microscopic porosity. Indeed, Loctite recommends the use of penetrant 290 Threadlocker to seal leaking welds in aluminum tanks. And, interestingly, warns that the maximum porosity it'll seal is .005". Hmmm again.
Well, I owned Norm's "stuff," so I might as well use it, I thought.
Smith's extensive directions sheet specified sucking a vacuum of half an inch to an inch of mercury out of the offending tank via the tank vent line-after draining the tank of fuel, obviously-but warned that this was not to be done using a vacuum cleaner. I assumed that this was because the suction of a vacuum cleaner could instantly collapse an aluminum tank. Smith, however, later explained that the greater danger was that enough fuel fumes remained in the tank to cause an explosion if sucked through a sparking vacuum-cleaner motor. Hard to believe, since there's virtually no airflow-other than as a result of what is sucked into the tank through any pinhole leaks-from the tank to the vacuum cleaner.
A Shopvac was my only convenient source of vacuum, though FBOs who specialize in this work usually have vacuum pumps made from modified air-conditioner compressors. And the Shopvac worked just fine, after proper precautions were taken. Most important, of course, was totally draining and cleaning the tank, then blowing it free of fumes. Since the vent line is at the very top of the tank and any residual fumes would collect at the bottom, I decided the risk was somewhere between minimal and nonexistent.
Then I made a simple water manometer (see photos), using a panel of scrap plywood, some hardware-store clear plastic tubing and water dyed black with a bit of ink. An inch of mercury is equal to 13.6 inches of water, so I marked the plywood panel appropriately. Actually, I marked it quite inappropriately, but a physics-savvy friend pointed out my error before any damage was done: The "inch of mercury" is not denoted simply by the water level dropping 13.6 inches but by the level dropping 6.8 inches and at the same time rising an equivalent 6.8 inches on the other side of the U of tubing, for a total difference of 13.6 inches.
If you have an old altimeter sitting around, that'll work as a manometer as well, since a gain of 1,000 feet in altitude is roughly equivalent to a vacuum of an inch of mercury.
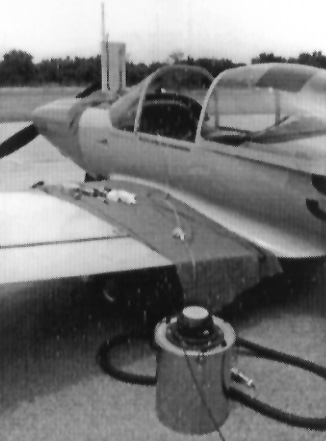
The manometer tubing led to a cutoff plastic bottleneck that I duct-taped to the filler opening of my airplane's front fuel tank. (None of this needs high-tech sealing, remember; you're dealing with an excess of vacuum, not a paucity.) On the other side of the rig, some more clear plastic tubing, taped to the nozzle of the Shopvac, led to a vacuum regulator that Alfred lent me and then to the fuel-tank vent fitting.
But before taping everything to the airplane and starting the vacuum cleaner, I tested the rig by eliminating the fuel tank from the loop, plumbing the vacuum line directly to the manometer line. Then, with a leather punch, I made half a dozen holes clear through the vacuum line. With the vacuum cleaner running, the holes open and the regulator screwed fully out (open), the Shopvac was able to pull barely any vacuum at all at the manometer. I progressively covered one hole after another with duct tape until the Shopvac was able to suck about six inches of water, then fine-tuned the rig by closing the regulator till the requisite maximum of 13.6 water-inches of vacuum was available.
If you don't have easy access to a vacuum regulator, you can accomplish exactly the same thing by covering and even half-covering some of the holes you've made in the plastic tubing; the regulator is simply a convenience.
The first step in AeroSealing a weld-line leak is to make absolutely sure the fuel tank is devoid of gasoline, particularly if the leak is along a seam at the bottom of the tank. You'd be surprised how much gasoline can remain in the crimp of a Falco tank weldment even after the tank has been drained. The only certain way to get it out is to blot it up with a clean, lint-free, absorbent rag tied to a string or wire and maneuvered into any such crevice with something like a wooden dowel. Simply leaving the cap off won't allow the residual fuel to evaporate. It'll puddle down there nearly forever in what is essentially a 100-percent-hydrocarbons atmosphere at the bottom of the tank.
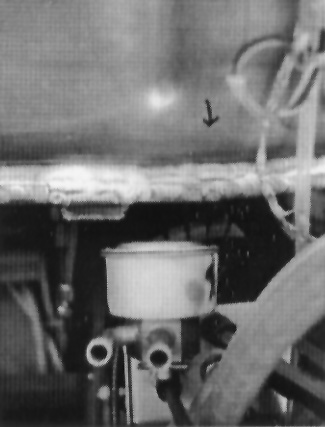
Next step: hook up your vacuum system to the tank, get the requisite six to 13 water-inches of vacuum established, and either spray or brush the AeroSolv on the point(s) of leakage-which, of course, will be denoted by a blue stain. You might also want to indicate the leak point with a Magic Marker arrow, since the solvent and a wipe with a clean paper towel will eliminate the telltale stain and leave you wondering exactly where the microscopic hole went.
The solvent will be sucked through the leak, thus cleaning it of gasoline. You might want to do this twice, and then wait 15 minutes or so for the solvent to thoroughly dry, with the vacuum running all the while.
Then-vacuum still running-spray or brush the AeroSeal directly onto the leakage area. Though Smith's directions don't specify it, it seems to me a good idea to have an assistant then slowly reduce the vacuum to zero as you continue to brush or spray AeroSeal on the leak. That'll avoid the possibility of pulling all the AeroSeal entirely through the leak and into the tank, leaving you no better off than when you started.
Finally, with the vacuum source now turned off, paint or spray one last coat of AeroSeal on the outside of the leak for good measure.
Did it work? Yup. No more blue stains. But is all this worth $280 (or $560 for the full kit) for a small bottle of what must be very similar to a $5.79 hardware-store squeeze-bottle of Loctite 290? Certainly it is if you have a Mooney and want to be legal, since Loctite is not STCed for use as a fuel-tank sealant. Smith says that his certification process had to prove to the FAA that AeroSeal neither attacked a Mooney fuel tank's rubbery internal PRC lining nor the airplane's engine. He also claims that Loctite does dissolve PRC and also, "It cures kind of hard and cracks easily. AeroSeal when it cures still has a little bit of flexibility, and you have to have that."
Smith also claims that he put some Loctite 290 into the gas tank of a lawnmower and "It stopped that thing cold." When queried as to how the minute quantity of Loctite that could migrate into a gas tank through .005-inch holes could possibly stop a lawnmower engine, Smith answers, "It screws up the injectors." Not knowing of a fuel-injected lawnmower, I find it hard to accept this explanation. (Nor does Loctite warn that its 290 sealant shouldn't be used on automotive-or lawnmower-fuel tanks.)
If some numbers that Smith dropped are legitimate, I'd guess that he's paying about $13 an ounce for the chemicals that go into AeroSeal. He claims that the certification process cost $15,000, and since there are only 8,500 Mooney M20s on the planet (albeit virtually all of them with weeping wingtanks at one time or another), one could certainly make a case for a considerable markup. Interestingly, Smith's basic rationalization for the markup is that a Mooney tank scrapeout and relining costs $5,000, so he sees AeroSeal as a one-ninth-the-cost bargain rather than a 700-percent markup.
But as an experimental-aircraft owner with a repairman certificate that allows me to maintain my Falco, what I've learned from this whole moderately expensive but educational episode is that (1) the key to sealing a pesky aluminum fuel-tank porosity is establishing a slight vacuum in the tank, to help draw a wicking sealant into the leak, (2) that building a rig to establish such a vacuum requires nothing more than a Shopvac, some scrap wood and about $5 worth of hardware-store plastic tubing, and (3) it's my bet that a $5.79 vial of good automotive/industrial penetrating anaerobic threadlocker will do the job just fine on any of our tanks.
Maybe I should have shopped at Pep Boys.
Aero-Trim Inc., 1130 102 Street, Bay Harbor, Florida 33154. Phone (305) 864-3336, fax (305) 864-5454.
|
|
![]()