Fiberglass
![]()
Fiberglass |
|
|
From "Construction Notes" Falco Builders Letter, March 2004 |
Jim Petty adds, "Also, it might be worth mentioning again that I still have molds for the control and main gear fairings for anyone to borrow (all they have to do is e-mail me and pay the postage). I lost my list, but I think I've loaned them to about a dozen builders so far." Find Jim's email address in the Falco Hangar on our website.
|
From "Construction Notes" Falco Builders Letter, September 1988 |
Since I've been working with fiberglass a lot lately making molds, let me talk about the process. Just in case any of you want to do the same. The process that I will be describing is what you go through to make a production mold. This process is much more involved that of a quick one-off part.
The first thing you do is to make the shape you are looking for. Ordinarily, you work in foam and fiberglass to get the shape. Once you have a rough approximation, you use body putty, which everyone calls "bondo." Bondo is a heavy mixture of polyester resin, industrial talc, and sometimes microballoons. You mix it with a cream hardener and spread it on. In a few minutes, it starts to harden and when it reaches a cheese-like hardness, you shape it with a Stanley Surform "cheese-grater." It gets rock hard in 15 minutes, and you can sand it. It is always easier to add more bondo than it is to take it away. You don't want to use bondo on your airplane-the stuff is frightfully heavy, but it is much easier to work and shape than epoxy and microballoons.
When you get very close to the final shape, there are a number of methods that can be used to get the final smooth shape. You can continue to work with bondo, but you will go crazy. If the area is large and very smooth, I prefer to use Featherfill or one of the equivalent products. Featherfill is a sprayable polyester resin with industrial talc. You add a clear MEKP hardener and then spray or brush it on. If it's the first coat, just brush it on, but spray once you get close to the final finish.
Once the Featherfill is hard, it will sand easily. Use a sanding block, or a piece of thin plywood with sandpaper over it. You should use an open coat sandpaper on Featherfill. Start with 80 grit and work up to 180 grit. As you sand, play a bright light over the surface and locate the low spots. If they are substantial, squeegee in a little bondo and work it down flush. Then spray on some more Featherfill and sand it smooth. The last fifty-thousandths will drive you nuts.
Once you think you have it finished, then I prefer to move to a black lacquer automotive sanding primer. Automotive paint stores sell the stuff in spray cans. It's neat because you can spray on a layer and sand in five minutes. I use 180 grit paper at this stage. High spots are easy to see because the sandpaper hits them and misses the low spots.
Fill in the low spots with surfacing putty. This is also a lacquer and dries quickly if you don't get it too thick. Surfacing putty is also sold at automotive paint stores. It comes in a large tube, is normally red, and you get a little black rubber squeegee to apply it. You go through a lot of sandpaper when you sand this stuff, since it clogs the paper badly. Spray on another coat of black lacquer sanding primer and sand it out. When you are pleased with the results and consider it finished, put on one last coat for final sanding with 220 and 400 grit paper.
It is now time to coat the part with a release agent. If you are making an epoxy mold you can use Freekote 1711 (Plast #17), which is a silicone spray. This is very convenient for small parts, but silicone sprays can cause a lot of trouble with painting. It is difficult to remove from a lacquer finish, and I'd suggest you stay away from the stuff unless you have a good reason to use it. Don't try using Freekote 1711 with a polyester. It will "fish-eye" .
Instead, use the wax/PVA method. I'm careful to use the waxes that the professional shops use and have no interest in experimentation with release agents. I use Mequiar's Mold Release Wax No. 8 in the gold can (Plast #118). Put several coats of this wax on the plug, buffing each out to a shine with a soft cloth. It is best to wait about an hour between coats of this hard carnauba paste wax.
Next you put on a couple of coats of Costa Chemicals Parting Wax No. 2 (Plast #11). This is a soft green wax that is compatible with PVA. If you don't use it, the PVA will not coat the part smoothly, and I find it is best to put a fresh coat of this wax on just before putting on the PVA.
PVA stands for polyvinyl alcohol, a green soapy solution that forms a very thin film over the mold surface. It acts as the parting layer between the plug and the mold. This is the green coating that you may find on the fiberglass parts you get from us. It is water-soluble, so you can easily wash it off with water. Apply the PVA (Plast #13) with a brush or by spraying. A foam brush works best. You only want to drag a very thin film over the part, but I always do more than that. I've very happy to sand out the mold and don't want to risk permanently bonding the mold to the plug.
Now comes the messy stuff-it is time to make the mold. The first layer to go down is tooling gel coat (Plast #78), and it is applied in a single coat by spraying or brushing. Brushing is high-risk, but I do it anyway with small parts because spraying the stuff is so much trouble. Always protect your hands with PR-88 hand creme and/or wear rubber gloves.
You want to get a heavy spray coat of tooling gel coat down. Get it too thin and the next step will cause "alligatoring". Get it too heavy, and it will crack and lift from the shrinkage. If you spray, wear a mask. Keep the mask on as you clean up the gun, then take a deep breath, take off the mask and get the hell out of the shop. If you wear glasses, immediately go over them with rubbing alcohol to clean off the little droplets that inevitably fall on the lenses. Take a shower and keep a polite distance from your family-even with all of this, you won't smell too good!
Polyester resins do not completely cure in the presence of air. (Laminating or "finishing" resins contain wax, which floats to the surface and causes the resin to cure completely. You do not want any wax in the resins used in your mold.) The polyester resins only cure when they are covered by another layer. Polyesters also have a fair amount of shrinkage, so they are not used for the entire mold.
When the tooling gel coat is set up-usually overnight-the next step is to put on a couple of layers of lightweight fiberglass cloth and a tooling polyester resin such as Plast #74. For the cloth, just use the 9 ounce bi-directional cloth (BID) sold by Aircraft Spruce and Wicks. It has an open weave and will wet out easily.
If the tooling gel coat was applied too thin or if it was inadequately catalyzed, you will witness the horrible sight of tooling gel coat "alligatoring" and this will give you some hint into the phenomenon of unexplained suicides among moldmakers. The polyester resin contains styrene, which attacks the gel coat. If the gel coat is too thin, it will crinkle. Small areas can be repaired on the inside of the mold, but if the damage is extensive, just let the stuff set up, rip it all off and start all over.
There is a way to cheat and get around this problem. When the tooling gel coat is still a little tacky, you can go over it with a brush coat of epoxy. This will give you good adhesion with the gel coat and will promote the complete cure of the gel coat.
After the polyester/glass or brush coat of epoxy is cured (usually overnight), you put on two coats of BID and epoxy and then 5 or 6 layers of epoxy and woven roving (Plast #223), but first scuff-sand the polyester surface with 40 grit sandpaper to give the epoxy some tooth to hold on to. For the epoxy, you can use any epoxy that is a laminating resin. Safe-T-Poxy, Plast #88/87 or West System are all fine. Do not use one of the gummier wood adhesives, such as T-88.
The moment of truth comes when you split the mold from the plug. You will need lots of little wedges. Professionals buy soft polyethylene wedges (Plast #64 & 66), but I make my own out of scrap pieces of wood. Getting started is like trying to open a terrified clam. You just have to keep hunting around with a knife until you can get a little crack started, then you tap in a wedge and work in more wedges. Some parts come out easily, while others require leverage with a two-by-four. One of the nice things about using the black lacquer is that if you screw up on the release, you will pull off the black lacquer-the plug will not be totally destroyed.
Wash out the PVA with water, and you should find a perfect mold of the plug. You will need to sand out the mold to get it really smooth for the production of parts. Start with 220 grit and wet-sand the mold until it is smooth and you see a consistant dull, sanded finish. Mix up a little white lacquer with MEK or lacquer thinner so it will put just a wash coat on the mold. Add a lot of thinner to do this. Take a paper towel, dip it in the mixture and wipe it all over the inside of the mold. Now when you wet-sand with the next-finer grit, you will be able to see any places you missed. Sandpaper makes scratches in the surface and each grade must completely eliminate the scratches of the previous grit. Work your way up to 600 grit.
If you are really determined to make beautiful parts, you buff out the mold with Meguiar's Machine Cleaner (Plast #111), followed by Meguiar's Machine Glaze (Plast #118), then use the two mold waxes and PVA as before.
I use West System epoxy, buy BID cloth from Wicks, but I get the rest of the materials from Fibre-Glast Developments Corp, 1944 Neva Drive, Dayton, Ohio 45414-5598. Telephone: (800) 821-3283 or (513) 274-1159. Their products are all listed as "Plast" part numbers above. This is a neat little company that caters to the small fiberglass fabrication shop. They have a great little catalogue and ship promptly. They have a 2-ounce plain weave fiberglass cloth that is just right for covering the plywood on a Falco.
The actual production of the fiberglass part is something I have little interest in. If you're like me, by the time you have gotten this far, you have developed such a hatred of fiberglass that you can't wait to ship the tooling off to your fabricator.
|
From "Construction Notes" Falco Builders Letter, December 1988 |
The Gougeon Brothers have a series of new products for their series of West System coatings and adhesives. The only one of any interest to Falco builders will be the 410 Microlight Filler which they claim is superior to microballoons. The ultralight fairing compound is said to be superior to microballoons because of its butter-like consistency when mixed with epoxy, even when mixed very thick. It is not prone to trap air, and it mixes more easily than microballoons. It is easier to sand and 30% lighter. I've not seen the stuff yet, but my experience is that Gougeon's products do what they say they do. If anyone tries this, please let me know what you think of it.
|
From "Construction Notes" Falco Builders Letter, March 1987 |
Lately I have been up to my elbows in epoxy making the tooling for the Sequoia 300 fuselage shells. I had been using a normal laminating resin, but I switched to West System epoxy just to see what it was like. You use a lot of epoxy when you make tooling-I've mixed and brushed on five gallons in a single night.
When you first pour that golden syrup, you would be excused for thinking that anything that looks like that would be good on pancakes. But the stuff is not good for you, in several ways. I know that you can buy rubber gloves-and I have a whole box-but I never seem to be organized enough to have them on at the right time. And even when you do have the gloves on, once they are well-lubricated with resin, I never seem to be able to get them off without getting some resin on my hands.
I rely instead on PR-88 hand creme, and gloves when I remember. I had tried PR-88 a couple of years ago at Oshkosh and was impressed, but now I'm here to tell you that you're out of your flipping gourd if you don't have a can in your shop-even if you don't use epoxy. It's great for paint as well.
Imagine spending the evening in a shop pumping and spreading gallons of epoxy resin. Despite your best efforts you get the sticky goop on your fingers. Then it's over to the MEK bottle, and you wash the resin off. The process repeats itself endlessly. When the session is over, you do one last cleanup with MEK and then head for the kitchen sink where you wash up in plain water. After all of this, your hands smell like Jurgens Hand Lotion! Any you don't have the slightest bit of dry skin from the MEK. Wicks and Aircraft Spruce both sell it. Get the big can and make it a habit to put a layer on every time you enter your shop and plan to glue or paint. Now, if I can just remember not to scratch my nose.
|
From "Construction Notes" Falco Builders Letter, December 1987 |
When it comes time to cover the plywood, all you need is a 1-1/2 to 2 ounce cloth and some West System epoxy. Wicks sells a lightweight cloth like this.
I don't know if it is worth the effort, but some Falco builders go for even lighter weight cloths. Before he started on his Falco, Craig Bransfield built model airplanes. For his tail feathers, he bought an ultra-lightweight cloth from a model-builder who sells the stuff as a side business. The 6/10 oz cloth is excellent for surfacing work and flexible enough to accommodate compound curves well. It is 38" wide and comes in 15' roll for $23.85, or 30' roll for $41.35. Add $3.75 for overseas air mail and handling. Order from Dan Parsons, 11809 Fulmer Dr., N.E., Albuquerque, NM 87111. Telephone (505) 296-2353. Visa, Mastercard accepted.
|
From "Construction Notes" Falco Builders Letter, December 1986 |
In our last builders letter, I quoted a Sikorsky engineer on composites. Now a Falco builder, Steve Wieczorek is planning to run a series of temperature performance tests on the various epoxies our builders have been using: T-88, FPL-16A, West System, etc. Because of the exceptional test facilities at Sikorsky, we should be able to plot the shear strength of each epoxy against the temperature. It's my guess that the results will not differ greatly with what we already know of the room temperature epoxies and that the West System epoxy will be slightly better than T-88. We'll see.
After publishing Steve's comments about the concerns at Sikorsky about field repairs using room-temperature-cure epoxies and hand layups, I learned about a recent accident of a Q2 in Maryland. The airplane was owned by the Q2 dealer there. The canard had been broken-from a landing accident, as I recall-and repaired. On a demonstration flight, the canard broke off at the repair, the plane crashed, and the pilot and his passenger were killed.
|
From "Construction Notes" Falco Builders Letter, December 1986 |
Joel Shankle has been making his wing hinge fairings and gear doors. This is his first experience using fiberglass and his first attempt resulted in more sticky fingers than anything else. The result of this first, unpleasant experience put Joel to thinking that there had to be a better way.
Joel had already made the fairing shapes of styrofoam, so he put a piece of Saran wrap down on the work table, laid up three layers of fiberglass and West System epoxy, and then covered this with another layer of Saran wrap. He was then able to pick this up and drape it over his styrofoam shape. To hold it in place he stapled through the fiberglass into the work table. This cinched the fiberglass around the shape. (An alternative method is to make a little horse-collar of plywood and clamp this over the fiberglass.)
When the epoxy had hardened, Joel removed the staples and Saran wrap. The surface was a little rough, but he was able to quickly sand it to shape.
Jim DeAngelo had made his fairings by making the shapes in paraffin and laying up the fiberglass over the wax-epoxy will not stick to wax. Steve Wilkinson did something similar. He melted some paraffin in a pan and then used a melon-ball cutter to scoop out the shape. He laid up the fiberglass and after the part was finished, Steve melted the wax again for the next part.
We have not yet made a kit of the landing gear doors, so until we do you'll have to make your own doors. I am rather worried about the main gear wheel well doors. I'm not sure how successful we will be in making a door that will fit everyone's Falco. This is a part of the airplane where there is bound to be some variation in the shape, and a door that doesn't fit your airplane is not worth much.
So let me describe the method that Joel Shankle used to make his doors. It's a method that many of you may have used anyway, and I suspect that there are many improvements that can be made to it. I'd appreciate hearing of any better ways of doing this.
When he began working on the doors, the entire bottom of the wing was skinned with plywood, and Joel had already routered the little recess in the plywood for the wheel well door. The airplane was upside down, and Joel removed the landing gear from the airplane.
Joel cut a piece of plywood to the shape of the wheel well, so that it would just fit down in the hole with very little room to spare. He set this piece of plywood down in the wheel well about an inch from the surface of the skin and installed blocks to support the plywood in that position. The blocks were stapled or clamped in position. The plywood makes a "floor" to support the foam.
Joel then cut a piece of foam to the shape of the hole and glued it to the plywood floor with hot melt glue. The foam was thick enough so that the top of the foam stood up above the skin. Joel used styrofoam, but any foam that sands easily will do-polyurethane or Clark foam will work as well. As the foam will later be cut from the plywood, you should only put glue around the edges.
Joel then sanded the foam to shape, sanding it smooth with the bottom wing skin around the edges and using a template to match the patterns shown on the drawings. Joel laid up three layers of fiberglass sandwiched between two layers of Saran wrap and put this over the foam and the bottom wing skin. This made the outer skin of the wheel well door.
When the epoxy was set, Joel removed the plywood/foam piece and trimmed the fiberglass for an exact fit to the wing, thus the edges fit exactly in the routered recess. Joel replaced the main landing gear and cut a hole in the plywood and foam so that it cleared the tire by about 1/4" all the way around.
(So far, so good, but at this point Joel goes in a direction that I think could be improved. Let's first follow through with Joel's method, which we'll call Option 1, and then I'll describe what I think is a better way as Option 2.)
[Option 1] Joel did not remove the plywood from the foam since he was working with a thin piece of foam, but if you have a thicker piece of foam, you should separate the plywood from the foam at this time. Joel beveled the foam to make the shape of the inner skin of the wheel well door. Once this was done, he placed it on a work table and pinned it down with a couple of headless nails. He sanded the foam to the shape required to make the inner skin.
Joel placed pieces of plywood around and under the edges of the foam to pick up the shape of the outer door. At the inboard face-where the hinge would go-he held the plywood straight so that the hinge mounting surface would be flat. (Because of the shape of his fuselage bottom, the outer skin of the wheel well door had a slight contour at the hinge.) He then did a second layup of three layers of fiberglass sandwiched between two layers of Saran wrap and laid this over the foam. This made the inner skin of the wheel well door.
Note that the inner skin was not bonded to the foam. Joel now had three pieces, the outer skin, the inner skin and the foam form. He trimmed the inner skin to fit the bottom of the wing, so that it was an exact fit into the routered recess around the edge. This inner skin had a large hole in the middle as it did not include the innermost reinforcement, which he made later as a separate piece.
Joel placed the inner skin in the airplane, and then put the foam form into it. He marked the outline of the phenolic block and cut out the foam to its outline. (Since he didn't have any phenolic, Joel used end-grain hardwood-which is fine.) Joel then fitted a piece of hardwood to fit the inner skin, and then sanded it to match to upper surface of the foam so that it would match the outer skin. Joel then glued the hardwood block in place.
In preparation for gluing the whole assembly together, Joel jury-rigged a straight piece of wood to support the inner skin of the wheel well door. This would keep the inner door from sagging under the gluing and clamping pressure. He also made a couple of slightly curved sticks, which he used to clamp the two door skins together at the unsupported outboard end where the wheel well door will mate with the gear leg door.
With all preparations for the final assembly finished, Joel put Saran wrap about the wheel well opening so he would not glue the wheel well door to the airplane. He put the inner door in place. The inboard end of the inner door skin was flat, as required by the hinge. As he made it, the inboard end of the outer door skin was curved, so some "adjustment" had to be made. Joel added strips of fiberglass cloth and epoxy resin to the inner door skin to build it up to the contour of the outer door skin. This done, he put epoxy at all of the mating surfaces and glued the outer door skin to the inner door skin. To hold the pieces firmly together, he used strips of plywood which he stapled to the bottom of the airplane, and the overhang of the plywood strips pressed on the wheel well door.
Because the two door skins were glued together on the airplane, they are a precise fit. When you drop the door in place, it gives out a reassuring "thud" as all points contact at the same time. You would go crazy trying to fit the airplane to a door.
This is a good, logical method, but the thing that bothers me is that when you are making the inner door skin, it is difficult to duplicate the shape of the outer door skin by placing pieces of plywood around and under the foam. Joel had this problem and had to cut off some of the outer flanges of the inner skin and repair it after the door was assembled. Picking up where we were at the beginning of Option 1, I will now describe the method I think might work better.
[Option 2] Place the outer door skin, concave side up, on the work table and support it so that it will not become twisted or distorted as you work on the foam to make the inner door skin. Shape the foam as required for the inner door skin.
Place a piece of Saran wrap over the outer door skin and set the foam in place. Lay up three layers of fiberglass and epoxy over the foam.
(The reason that Joel did not do this is that he used staples to hold the fiberglass down in place. Remember, in his method he first laid up the three layers of fiberglass on a piece of Saran wrap and then placed this over the foam form. These layers did not push into place easily and required staples. My experience is that if you use a number of pieces of fiberglass cloth, orient the weave properly and lay them in place one at a time, the fiberglass cloth will take this kind of a shape without pressure.)
This makes the inner door skin complete with the foam in place. Trim the inner door skin to fit the gear door opening. Locate the phenolic or end-grain hardwood block and cut out the foam down to the inner door skin. Shape this block to fit and glue it in place. Then assemble the wheel well door as described in Option 1.
With either method, you have made the inner door skin and outer door skin as separate pieces. Each is reasonably flexible and will distort slightly to fit the airplane. Since the door is assembled by gluing the two pieces together on the airplane, they are a perfect fit for your airplane. And since it is fiberglass, it's supposed to be Eze!
|
From Falco Builders Letter, March 1985 |
Jim Petty reported that he has found the "dry flox" material used by composite builders a very useful thing for certain applications. Dry flox is a mixture of epoxy and flocked cotton. The flocked cotton is a form of cotton fibers that look like lint. This can be purchased from Wicks or Aircraft Spruce. To make the mixture, you mix up some epoxy (Safe-T-Poxy is most commonly used) and then add the flocked cotton until it will stand on its own. Because it is relatively dry, it does not adhere well, so the normal procedure is to set aside some epoxy and brush a coat on first.
Dry flox is used as a "structural" material on composite aircraft. It is reasonably strong and fairly heavy (almost the same weight of pure epoxy resin).
Because it has good compression strength, Jim has used it in a number of places for easier construction. The hinges that bolt to the aft wing spar require tapered shims under their base to align with the hinges on the ailerons and flaps. Rather than make a tapered wood shim, Jim just bedded the hinges down in dry flox. To keep the flox from bonding to the hinge, Jim covered the base of the hinge with some plastic packaging tape (the same type of brown tape we use on our boxes). When the epoxy was cured, he had a perfect match.
I can see how this material would come in very handy in many places in the Falco. The top of the dorsal fin is routed to match the aluminum tube that is used as a canopy track. If the tube did not fit perfectly, you could bed the tube down in dry flox. The canopy is installed with a strip of spruce between the canopy frame and the plexiglass, and dry flox might be a good thing to use there.
Dave Aronson used dry flox to fit the windshield to the fuselage skin. On the original production Falcos, strips of spruce were glued on and sanded to the required shape. Dave just covered the windshield with duct tape and stuffed dry flox in the joint.
I have also been wondering about using this material as a gap filling materials in wood joints where a perfect fit is difficult. At the aft face of frame No. 6 the bottom tail cone skin is glued to the frame. A spruce lamination is on the aft face to receive this skin. You can measure and sand the angle on the lamination prior to gluing it on the frame, but you cannot float sand this piece very easily. It may be possible to use dry flox in this joint and others like it. Before you do this, I would suggest that you run some test blocks with a thick line of dry flox to determine if the shear strength is as great as that of spruce or birch plywood. As long as you have failure in the wood over 75% of the area you will be all right.
|
From "Tool Talk" Falco Builders Letter, September 1985 |
Builders using epoxy should purchase a can of PR88. This is absolutely the best hand protection creme you can get. It is a white glycerine-based creme which you apply to your hands. You can work with paints, epoxies and the like without any effect, then wipe your hands dry with a paper towel and finally wash with water alone. You can rub your hands with the creme, then spray them with paint. After the paint is dry, you just wash them with plain water, and it all comes off-truly amazing stuff. You can purchase it from Wicks or Aircraft Spruce. A small plastic cup is $3.95, but I recommend the 1 liter container which sells for $19.95.
|
From "Construction Notes" Falco Builders Letter, September 2001 |
Jeff Morriss recommends a Fien detail
sander to trim fiberglass. This power tool (www.FeinUS.com)
has a triangular sanding disk that vibrates, and you can substitute
a diamond saw for the sanding disk. Because it works with small
vibrations, it's a very safe tool and you can hold your hand against
the 'saw' and do nothing more than tickle your hand.
|
From "Construction Notes" Falco Builders Letter, December 2001 |
From Gord Cook. "My drawings show six layers of nine-ounce glass cloth for the gear and wheel well doors. Is this six layers per side or three layers per side for a total of six? A friend in the business seems to think that six layers for each side of the door is a little on the heavy side. He thinks that three layers would do it. Also what type of resin do you recommend, polyester or epoxy?"
The drawings mean three layers per side for a total of six, and you should use epoxy resin, not polyester.
|
From "Construction Notes" Falco Builders Letter, December 2001 |
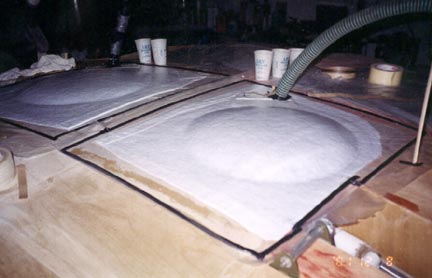
From Gord Cook: The attached photo shows the vacuum bagging method of constructing the wheel well doors. I started the procedure by building a plug around the tires making sure I left sufficient clearance to ensure the proper retraction of the gear. The plug was made up of ordinary pink insulating foam and drywall filler. With the plug as smooth as I could get it I put several coats of latex paint on it (I was afraid an oil base paint might have a detrimental effect on the foam) and when it was dry waxed it thoroughly with a mold release.
I then wetted three layers of 9 oz glass cloth and placed it over the plug making sure there were no air bubbles present. Over the glass, I put a special nylon cloth (available at most fiberglass product outlets) and over that I place a soft cloth to soak up any excess epoxy (also available at your favorite fiberglass outlet). Over all this I placed a piece of two mil plastic which was sealed to the plywood with glazer's tape (a soft two-sided black tape about 1/4" wide and 1/16" thick) to form an air tight seal around the wheel well door. A small cut was made in the plastic sheet and a vacuum cleaner hose was attached with the same glazer's tape and the machine turned on. I left the vacuum on about four hours since I had used a slow-curing hardner.
I constructed all my wing fairings and gear doors using the vacuum method prior to doing the larger wheel well doors. If anyone would like more info just drop me an email.
Gord Cook
gord_cook@telus.net
|
|
![]()