Bending the Wing
Leading Edge Skin
![]()
Bending the Wing
|
|
by George Barrett
|
This appeared in the September 1991 issue of the Falco Builders Letter. Some builders bend the wing fore -- er, leading edge-skin on the wing. Others prefer to pre-bend the skin to avoid distorting the wing and fighting with spring-back in the plywood. George Barrett's method, described below, uses a precise form to shape the bend. Alfred Scott |
A form is made duplicating the wing leading edge. I used three 12-foot lengths of obegee wood: one 2 x 3 and two 5/4 x 4. These were glued up to form an "A"-shaped frame internally braced by eight spaced equally triangular pieces (Fig. 1). The frame was then clamped to a long table and planed to the airfoil shape. Each of the 14 stations is marked and the proper curve at each verified by templates made from the rib drawings.
Figure 1. The "Form"
I used obegee wood for the form because it is a soft wood that planes quite easily.
Figure 2. The "Seat"
A 12-foot, angled "seat" was made upon which the form was set on the long table (Fig. 2). This seat was uniform in size throughout its length and is screwed to the form using four two-inch drywall screws. The exact location is determined by measuring or estimating the position that the to-be-bent plywood sheet's edge will occupy when locked to the leading edge form. There must also be clearance for the lock bar to fit snugly on the leading edge of the form and grip the leading edge of the plywood sheet evenly (Fig. 3, 4).
Figure 3
A straight, hardwood lock bar, approximately 1 x 1 x 52 inches, is screwed to the form so as to grip the plywood sheet leading edge evenly along the leading edge of the form. I drilled four holes equally distant along the lock bar, each 10mm from the top edge.
Figure 4
The lock bar is carefully placed on the form so that its top edge follows the line on the wing's leading edge where you wish the sheet's leading edge to rest. The lock bar is screwed to the form so that it will snugly grip the plywood sheet in the exact position you want. When you back off the screws a bit, there will be a 10mm slot into which the sheet's leading edge is set for bending (Fig. 4).
The form is then clamped to the edge of the table so that the sheet will lay reasonably parallel to the table top when the bend is completed.
The lock bar will be relocated for bending sheets at the three sections 1-6, 6-10 and 10-14. The form will be reversed and rescrewed to the seat when topside sheets are bent. In total, there will be two sheets bent at each section on each side of the form. This will require a minimum of 6 moves. You should mark locations of the critical lines on the form and seat.
Before bending, the leading edge of the sheet to be bent is soaked for two days.
Figure 5
I measured each sheet on the wing and precut it to the exact shape for the section to be covered (e.g. lower right 1-6). The critical angle is that of the leading edge to the rib line. I drew a line along the inside of the leading edge of the sheet where it meets the aft edge of the leading edge strip (Fig. 5).
I drew a line on the leading edge strip where the edge of the sheet is to sit. This is the "estimated" line a bit over the middle which will angle slightly inward as you move toward the wing tip.
Using a cardboard strip, I measured the distance between the aft edge of the leading edge strip and this "estimated" line (Fig. 6, 7). This distance was marked at its respective places on the sheet using the "inside" line as the index. The sheet was laid on a table and the two points connected by a line. This "estimated" line will be the line for the sheet's leading edge.
I drew another line 10mm farther forward. This gives you the 10mm area to be gripped by the lock bar when bending the sheet (Fig. 6, 7). I cut off the excess plywood freehand on my bench saw. I have a large saw table arrangement with "roller horses" to permit easy maneuvering of plywood sheets in the cutting process. I use a 6" Sears 200-tooth fine cut blade which is excellent for cutting these thin sheets.
The soaking trough was designed to hold approximately 4 gallons of water as this was all I could boil at one time on my basement stove. I put a spigot at one end to permit draining through a hose to a floor drain. The trough was 52" by about 10" high.
To hold the sheet in the best position on the form, I used a 50-inch 2 x 4, one face of which was chambered-or hollowed-out a bit to form a concave curve to fit more closely on the form (Fig. 4). A similar chamber can be put in the 1x1 lock bar.
When you are ready to bend, drain the water in the trough and replace it with boiling water. For the 2.5mm 1-6 sheets and 2mm 10-14 sheets, I added an intermediate step of 4 gallons of hot household water before the boiling-water step. How much this helped, I do not know. Let the sheet soak 12-15 minutes in the boiling water, then remove and insert the leading edge to be bent into the slot between the lock bar and the form. Be sure you have the inside surfaces against the form.
Figure 6
Tighten the four screws to secure the sheet firmly in the lock. Then press down on the sheet carefully bending it back over the form. This went surprisingly easily on all but the 2mm upper 10-14 sheets. Be sure the edges are rounded snugly on the form. I laid a 2x10 on the sheet to hold it down while I placed the 2x4 upper lock on the form so that it will lock the sheet firmly on the form. Clamp this in place. I used five 12" Jorgensen clamps along the face, clamping against the front edge of the table (Fig. 3, 4).
Initially I did not plan to scarf the edges along the ribs before bending as I feared that even a small error in the leading edge angle would misalign the edges with the ribs. But, it turned out that the alignment was better than I expected. I scarfed these edges before bending as this saves a lot of work, and the scarfing table does a much better job. If you are off a little, it is much easier to correct a scarf by taper-sanding than doing it from scratch.
If you scarf before bending, you must have the sheet close to the correct width beforehand. But, you can play it safe by leaving the sheet about 25mm too wide and cutting off one side if you discover misalignment after bending when you fit the skin on the wing. You can then realign if necessary and scarf after bending, which involves at least some hand scarfing on the curved edges. My experience was that all the sheets fitted well on the ribs with no more than 2 or 3mm variation which was acceptable.
By trial and error, I found that you must let the 2 and 2.5mm sheets dry at least 5 days, the others 4 days. This is usually sufficient to retain the curve until you glue on the skin. By proper sequencing, you can set up an assembly-line affair, fitting, cutting, scarfing and soaking skins while the previous one is drying, and gluing them on in the lulls.
The main advantage of bending on the form is that you avoid distortion of the wing, which can be caused by bending on the wing, and it is much easier to bend and clamp the sheets on a flat table than in the air on the vertical wing. The disadvantage is that you risk misalignment of the rib edges if the leading edge angle is not correct. Once you have the form made and set on its seat on the table, the whole process goes rather easily.
Figure 7
Making the station 14 bend on the 2mm upper skin is the most critical. I cracked the first one. The second effort was successful. For this I applied additional heat with a steam iron held against the wet end of the sheet adjacent to the lock bar, and made the bend slowly.
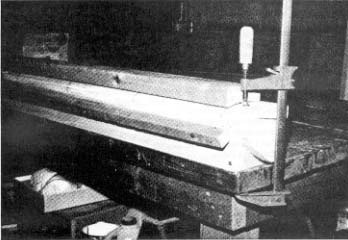
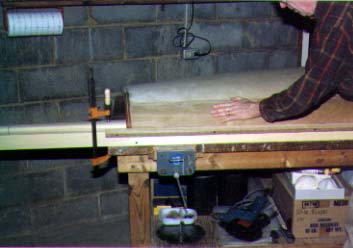
Here's the whole thing set up. One form is used for both wings.
You can use the skinning sequence in the construction manual, which involves 12 shifts in the seat on the form. This can be cumbersome. Alternatively, you can install all the lower skins first, beginning with 1-6, 6-10 and 10-14 on one side. This required only 4 changes in the seat setting. It also avoids the long wait before installing the upper skins after bending, during which the bends will relax a bit, even over one day. But, it requires a different method of "sketching" the framework on the skins, unless you trace all of them before you install any skin. This can be done, but there is some risk of slight misalignment.
The alternative "sketching" is done after the top skin is bent and actually fitted onto the wing and "pinned" with 2 nails. Measure the location fore and aft of each rib from an index line. For skin 1-6, this index is the inner edge of rib 1. For 6-10 and 10-14, the index is a line drawn on the previous skin along the new skin's overlapping edge. You "eyeball" the spar and the leading and trailing edge lines. You can check the lines with a small mirror on a stick, or a dental mirror if you have one.
With sheet locked onto leading edge by the 1x1 lock
bar, being bent back after boiling water soak.
|
|
![]()