Notes & Comments
Woodworking Methods
![]()
Notes & Comments
|
|
|
From "Construction Notes" Falco Builders Letter, September 2003 |
Roger Home asks "When the construction manual calls for a test block (2"x2" maple) glued up for each batch of glue used, are builders gluing one of these blocks and testing them for each and every batch of glue mixed? As an example, I am gluing my ribs in three sittings. First the rib caps and support braces, then the ply gussets, then the ply overlay sheet. Does that mean I will end up with three test blocks per ribs?"
Just run some test blocks to confirm that you are getting good glue joints and that your technique is right. You will know when you know what you are doing, and then you can work with confidence. Also, if you get a new batch of glue and worry about that, then do some test blocks.
And also "In these early days of building, would it be possible to get some kind of weight comparison with the pre-assembled ribs, i.e, am I building too heavy, with too thick an epoxy, etc. I would be interested to compare the weight of the pre-assembled ribs from station 0 and 1 on the stabilizer, just to confirm that I am in the ballpark."
We don't have any numbers on this, but you can really add a lot of weight by slopping the epoxy on.
|
From "Construction Notes" Falco Builders Letter, September 2003 |
Well, my Falco project has begun! I would appreciate some advice on plywood. I ordered (and received) aircraft grade Birch ply from Demel Aircraft up here in Canada. When they delivered it, it had Mahogany OY printed on the sheets as well as Birch plywood. My immediate response was one of concern as you state that Mahogany ply is not to be used on the Falco. I have since learned that the company is called Mahogany OY in Finland, and the ply is aircraft grade birch. My concern is that there is Birch on both surfaces but the centre sandwich is unspecified, and is a dark brown colour. Could this be a Mahogany centre, and if so, is that a concern?
Roger Wright
As the president of your company, I'm sure you can understand the difficulty of being asked to comment on something you've never seen or that someone has not bought from your company! But I'll try.
First, there is no such thing as 'aircraft grade' birch plywood. Instead, there is a specification of the grade, which for plywood made in Finland typically is GL I, GL II or GL III. That stands for Germanisch Lloyd, and it's the split-off from Lloyd's of London during the unpleasantness of WW 1 and WW 2. The specification is for a grade of plywood suitable for marine construction, and it was required by the insurance companies before they would insure a boat or ship made of the stuff. As it happens, aircraft use the same plywood.
Generally, what you want is GL II or "GL 2". The three grades are all made at the same time and in the same process, but it's simply a matter of grading the finished product, with GL I allowing for fewer imperfections in the wood that GL II or GL III. GL II is by far the most common grade and it's all we use. Only occasionally over the past thirty years or so have I heard of someone who had some GL I, and I always had the impression is was more a matter of snobbery than any real understanding of the quality of the wood.
All of our GL II plywood is made by Mahogany OY, and there is a red stamp in the corner of most of the sheets, with handwriting for the GL specification, the thickness of the plywood and the number of plies. I think you will find the Roman numeral "II" to the left and the millimeter thickness and number of plies to the right.
The plywood is always made with alternating plies at ninety degrees to each other, so you will see a different color for each layer, but if you turn the sheet and look at the other sides, you will see that the light-dark-light pattern will change to dark-light-dark.
I once saw the specification for GL II plywood, and I don't remember much of what it said. I don't know for sure if it specifies that all layers are made of birch, but I think that's true. In any event, when you buy plywood from Finland, you can be very, very sure that they are making the plywood of their native birch and not importing mahogany from South America! Even when mahogany is used in plywood, it is typically only used on the outer plies, because it is so expensive.
Mahogany or birch plywood made in the US is typically made with the inner plies of poplar. But since we only use GL II birch, I haven't spent a lot of time weighing the merits of the various grades.
Scoti
|
Here's a self-explanatory photo from our photo bin: |
|
From "Construction Notes" Falco Builders Letter, June 1996 |
Al Dubiak mentions that he came up with a novel and effective way to remove staples. He uses a soldering gun to heat the staples, which then come out easily. Al doesn't know why this works, but he thinks the heat melts the glue. What I'm wondering is what brought him to try it in the first place!
|
From "Construction Notes" Falco Builders Letter, June 1993 |
Guglielmo Leggeri in Italy asks about whether you should use a torque wrench when tightening nuts on bolts which go through the wood structure. You don't need a torque wrench for this, and you certainly do not want to torque the nuts to standard values because it would crush wood. It is sufficient to tighten the nuts by hand and by feel. You should tighten the nuts firmly but without compressing the wood (although, when a single large washer is used, the washer is often slightly deformed from the compression).
|
From "Construction Notes" Falco Builders Letter, September 1993 |
On his way from South Africa to Oshkosh, Fanie Hendriks stopped by. In talking about his project, he mentioned a clever method of temporarily clamping parts in place on the wood structure. The part might be an aileron hinge or one of the rudder pedal supports that go on the inside aft face of fuselage frame number one. These are difficult parts to clamp in place while you drill the holes.
Here is what Fanie does. He protects the wood by putting a broad piece of masking tape on the wood, and then he covers the base of the metal part with another piece of masking tape. He uses instant cyano-acrylate glue to glue the part in position, but because of the masking tape on both surfaces, what he is really doing is gluing the two pieces of masking tape together. This has good shear strength, and the part is held firmly in place, but it is still easy to break it loose by prying. Once the part is removed, the masking tape peels off the wood and the metal part easily.
|
From "Construction Notes" Falco Builders Letter, December 1993 |
Steve Tweedt reports that in setting up his Falco shop, he bought a number of drill presses. He went through several brands, all made in Taiwan, and returned every one because of the wobble and free play in the arbor. One of them would wobble as much as .020". Steve finally bought a drill press made in Canada by General, and he is delighted with it.
|
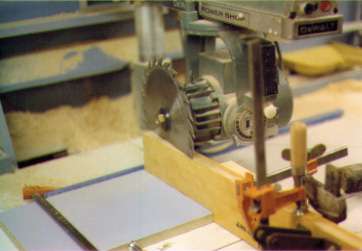
From "Construction Notes" Falco Builders Letter, June 1992 |
Wicks Aircraft is selling a set of drawings for a plywood scarfing machine. It uses an electric motor and a sanding drum. From the photo, it appears that it rides on rails, but that might be an illustion. The package includes a 30" x 24" blueprint, instruction, parts list and five colored photos. It's P/N SJP-1 and it's available for $12.95 from Wicks Aircraft, 410 Pine, Highland, Illinois 62249.
|
From "Construction Notes" Falco Builders Letter, September 1992 |
With ribs now being shipped, we're getting questions about those things. Our wing ribs, like those made by Trimcraft, are assembled by stapling the gussets and plywood plates in place while the glue dries. So the inevitable question that is raised is whether to pull the staples out.
For years the conventional wisdom with wood aircraft has been that you do not pull the staples out. All of the production Pitts Specials are flying with staples still in the wood. The theory is that you may do more damage to the wood than you save in weight, plus the staples probably add some strength.
Falco builders, however, have always found a reason to rationalize taking the staples out. This starts with concerns about the reception of the internal antennas. The staples may have some effect, but we don't know for sure. Then there's the concern about weight. We've had a number of builders pull the staples out of the wing ribs, save them in a jar and then weigh them. They all report that you save nine ounces by pulling the staples.
Some builders worry that the metal staples could rust in time and cause rot. Nonsense. A staple buried in the wood and varnished over is as protected as the wood, and if the staple oxidizes in time, that means that you have some iron-oxide particles in there, but they don't attract water.
Finally, there's the subject of appearance. Even though it's inside the airplane, and most of the ribs can never been seen once the wing is finished, Falco builders tend to be compulsive about this sort of thing. (Remember the difference between addiction and compulsion: The addict can't help himself. The compulsive knows it's wrong and does it anyway!) My guess is that every single Falco builder has pulled the staples out, each rationalizing it in his own way.
|
From "Construction Notes" Falco Builders Letter, September 1992 |
With the wing ribs that we are making for the kits, we are using full plywood plates on both sides of the rib on any rib that had a full plywood plate on one side. As a matter of making the parts in production, this is the only way we could make sense of things. This creates a few more closed areas than before.
When I was drawing the wing ribs, I drew a lot of vent holes in the ribs so that the interior compartments of the ribs could 'breath' to allow the pressure to equalize when the plane flies at high altitude. As a practical matter, I doubt that it's necessary to do this everywhere, just on the larger compartments.
Where you have an unavoidable hole, such as for the control cables, I'd slosh the rib with some varnish and then drain it. When you have a small hole in a rib where a wire passes through it, I'd glop some epoxy around the wire on each side to seal it up and keep the wire from moving, and not attempt to seal up on the inside.
|
From Falco Builders Letter, June 1990 |
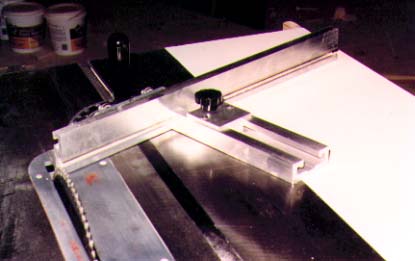
If you've got a table saw, here's an interesting little device. The Miter-Matic attaches to your miter gauge and is made of two pieces of aluminum extrusion. A long bar extends the miter gauge, and you can move it left-to-right so that the bar can be close to the saw. The second piece is an adjustable stop, which you can remove or move along the entire length of the long bar. As I remember, the Miter-Matic costs about $60.00 and is available from Paragon Industries, Hwy 1110, Whick, KY 41390, telephone (606) 398-2790.
|
From "Construction Notes" Falco Builders Letter, September 1990 |
A recent Gougeon Brothers' The Boatbuilder newsletter has an idea for a simple, cheap clamp that's usuable with light clamping pressure is needed. The clamps are simply split rings of plastic pipe. You cut the pipe into rings and then split them open. When pulled open one inch, the resulting clamp will provide about 8 pounds of pressure. The inventor of these clamps, who used them for clamping the gunwhale strips together, says that both 2" and 3" plastic pipe works well. There's some question about the material used. The clamps shown are probably ABS, judging from their dark color, but are identified by the author as PVC, which is white.
And if you've read The Boatbuilder, then you've probably been keeping up with the progress of Don Spaulding who is building a pedal-powered boat which he intends to pedal around the world, solo. Seems like a long way to go to feed a Great White.
|
From "Construction Notes" Falco Builders Letter, December 1990 |
Has anyone tried to use a biscuit joiner as a scarfing jig for plywood? I wouldn't run out and buy one for that purpose, but it seems like it might work and would be relatively easy to set at the correct angle.
|
From "Construction Notes" Falco Builders Letter, March 1989 |
Free-hand rough scarfing of installed skins seems real easy using a pneumatic right-angle drill with a sanding disc, using 80-grit paper. The disc that I got is made by 3M, and your local hardware store is sure to have it. This drill turns much more slowly than my die-grinder, and also because of the relatively light weight (compared to an electric drill) and the working angle seems much more controllable and less tiring. Again, the pneumatics never get hot, but you should watch out for moisture and oil coming out of the exhaust and getting on your work. The drill uses so much air volume that I doubt that a small filter/moisture trap such as is used for paint spraying would be useful-too much pressure drop.
I found that the easiest way to almost-finish such a scarf was with my 22" long tee-bar with carbide abrader flats stuck on the bottom. I got the best results holding the bar at right angles to the length of the joint. With the long bar out there in the breeze, I was able to remove material quickly (high pressure, small footprint) almost to my marked scarf line, with a consistent angle. Final finishing was with the bar laid along the scarf for a few passes.
Craig Bransfield
|
From "Construction Notes" Falco Builders Letter, June 1989 |
There is one little peculiarity to pneumatic staple guns that is worth noting, and that is that the staple does not apply any clamping pressure unless you push on the gun at the time you pull the trigger. Unlike a hammer, which not only drives a nail into wood but also provides a lot of clamping pressure, a pneumatic staple gun just shoots the staple-nothing else. It's almost as though clamping was not in the gun's job description.
We discovered this while using the gun for crating. We ship plywood in a stapled-together picture frame that's covered with cardboard. If the cardboard is not pressed against the wood, the gun will simply shoot the staple in. It's strange to see a series of 5/8"-long staples driven through the cardboard and into the pine crating, but still with a small space under the cardboard. So if you want clamping pressure on your glue joints-and you should-you will have to hold that pressure with the staple gun at the time you pull the trigger.
|
From "Construction Notes" Falco Builders Letter, December 1989 |
Howard and Marty Benham rigged up their Delta belt/disk sander with a flex cable and chuck in place of the disk and use this for a sanding drum and rotary rasps.
|
From "Construction Notes" Falco Builders Letter, June 1988 |
If anyone is making or using a table-style scarfing jig, I think the best driver-and-tool combination is a pneumatic die grinder and a metal rotary file bit. I was able to find a bit set including a cylindrical one 35mm long by 15mm diameter with staggered straight flutes, which scarfs the plywood very nicely. My bit set was apparently made in Germany, and I found it at a local discount tool shop. The pneumatic die grinder can't be beat here, because it can't overheat even if you stall it.
Craig Bransfield
|
From "Construction Notes" Falco Builders Letter, September 1988 |
Here's a neat little trick that Larry Black has to offer. When you scarf and splice two boards together on the bench, put a piece of masking tape about an eighth of an inch back from the edge of the scarf on both sides of both boards. Then when you clamp the boards together with a plastic block over the wood, the glue will squeeze into the area between the masking tape and then squirt out at the sides. When you remove the clamps and blocks, zip off the tape and you will find a quarter-inch ridge of glue that is easily removed with a scraper.
Larry also cautions to only use 3M masking tape. He is in the auto painting business and has tried them all. "Forget all about the other brands" he says. The tape for this purpose is just a 3/4" wide crepe paper masking tape.
|
From "Tool Talk" Falco Builders Letter, March 1987 |
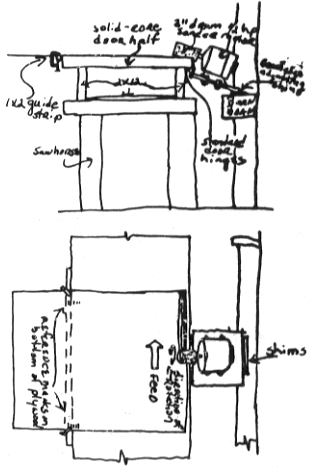
Steve Wilkinson's Scarfing Jig
I've seen a lot of complex and expensive suggestions for scarfing jigs that involve such things as radial-arm saws, but I just made one based on Tony Bingelis's idea as shown in his first Sportplane Builder volume, and it works beautifully. Its major advantages-to me-are that it is a permanent emplacement that is part of the workbench yet is out of the way; that it uses the entire expanse of the workbench top as a support for the plywood sheet rather than having a small table-saw table as its "bench"; and that it was cheap to make.
The fact that it's a permanent emplacement means that there's no worry about set-up time or what the scarfing angle is. Once you get the thing built and adjusted to the proper angle, you never have to move, disassemble or change it, and every two scarf joints you make will be perfect matches. That to me is more important than whether the scarf is exactly 1:10 or 1:15 or something in between.
As for why I like having the entire workbench top as a support surface, I tried with varying success to feed 2'x4' sheets through a scarfing using my foot-square Shopsmith table, and it was awkward. Doing it with 50"x50" wing skins would be like trying to serve a pizza on a saucer.
My main Falco-building bench is a large, thick, solid-core door cut in half vertically, butted end-to-end and screwed to the top of a frame of 2x12s for stability. Small birch-plywood shims are used between the 2x12s and the door pieces to achieve absolute levelness of the table top, because I used the thing as a bench for building long tail and control surfaces accurately.
I've mounted an ancient 1,750-rpm 1/2-hp washing-machine motor
that somebody literally gave me, on a board hinged off the back
edge of this workbench, with a three-inch drum sander on the motor
arbor and the assembly adjusted so that the lowest part of the
drum sander actually bites into the workbench back edge to depth
of 1/4" or so and from there on "up" forms an angle
that sands a perfect 1:12 scarf off each sheet of plywood fed
through it.
The board on which the motor is mounted is, fortuitously, supported
by a horizontal structural member of the barn in which I work,
plus a couple of shims to achieve the exact angle I want.
The drum sands the top rear edge of the sheet of plywood, and straight-line accuracy is easily achieved by C-clamping a five-foot piece of 1x2 to the bottom front edge of the piece of plywood being scarfed. There is no need to nail the guide strip to the plywood, because the workbench edge is true and is much longer than the 1x2 guide strip. (You could, in fact, simply use a block of wood at each side of the plywood sheet, but the guide strip is easier.)
I measure the distance from workbench edge to where the drum first contacts the sheet, and then mark off that measurement plus maybe five 5mm increments "outward" (away from the sander), at the left and right edges of the sheet being scarfed, and clamp and reclamp the 1x2 guide board at these marks in whatever increments experience shows is best for steady and easy feeding of the sheet through the drum. In other words, I find it easier to scarf a 2.5mm sheet in maybe three passes than to manhandle it through in one sawdust-spewing, motor-groaning feed.
My one problem is that the motor normally wants to rotate clockwise (when viewed from the arbor), and that unscrews the drum sander's internal tightening mechanism, flinging the ----er westward at 1,750 rpm. Fortunately, the motor is so old and loose that it can be made to run backward (CCW) by giving the drum a flip just as you turn the motor on. So if anybody does this and buys a standard sanding drum, you better either know how to make a motor run backward or get a drum with reverse threads, if there is such a thing.
You also have to be sure to mount the thing in a position on the workbench that allows you to feed the plywood against the drum's rotation rather than pushing it into the drum in the same direction in which it's rotating, The latter makes the drum want to snatch the sheet and jam.
Steve Wilkinson
|
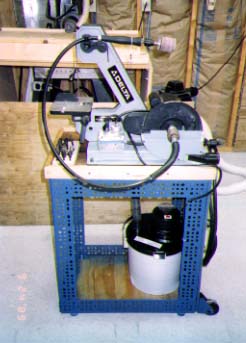
From "Construction Notes" Falco Builders Letter, March 1987 |
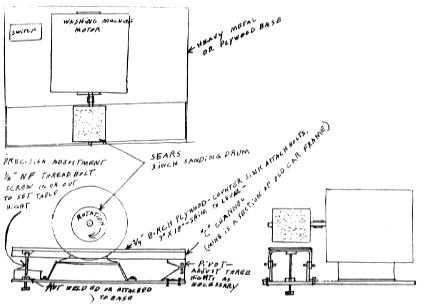
Don Stark's precision sander
Your last newsletter shocked me because something I have taken for granted from the beginning may be a problem to others. You said "The best method is to use a thickness sander, but they are quite expensive." I don't know how a person can build a Falco without a precision sander. I built one for almost nothing and out of mostly scrap. It is crude and simple but very accurate. Most people would have to buy only one part from Sears Roebuck to be in business. That part is a three-inch sanding drum, catalog number 9GT25244 (on page 17 of Sears Specialog 1986-87). Attached is a crude-repeat crude-drawing but you get the idea of how it works. I use it to get exact thickness on parts including the 3mm laminations for fuselage rings, and it does the most beautiful job of scarfing you ever saw.
Don Stark
The thickness sander I was referring to will sand a much wider piece of wood-48" is the normal size. It is a huge, expensive machine that is used for sanding table tops, piano soundboards and entire Falco fuselage frames. Thus, the two sanders are not exactly comparable.
Alfred Scott
|
From "Construction Notes" Falco Builders Letter, March 1987 |
Charles Gutzman found a good way to remove staples from his ribs. He is making his own ribs and on stapling the gussets found that he wanted something to follow the irregular pattern of the staples. He got some braided nylon cord at a local hardware store. It is about 1/8" wide and is used by brickmasons.
Charles simply ties a knot in one end and starts stapling over the cord, leading this-way and that-way as he moves around with the pneumatic staple gun. After the glue is dry, he puts on a face shield for eye protection and gives the cord a yank. The staples that don't fly loose have one leg in the air, and they are easily removed with pliers.
|
From "Construction Notes" Falco Builders Letter, June 1987 |
Andy's Steam Jenny. When it came time to bend the plywood at the tips of the elevator leading edge, Andy Loncarevic "appropriated" a pressure cooker from his mother. On the top of a pressure cooker, there's a little weight on top of a tube that lets excess pressure out. Andy took the weight off and shoved a quarter-inch ID hose on the tube. He put some water in the cooker and put it on a hot plate. To bend the plywood, he just blew the live steam on the plywood and pulled it around as pretty as you please.
|
From "Tool Talk" Falco Builders Letter, March 1986 |
I think scarfing is more easily done with a radial arm saw by using the rigid (8"?) disc sander, turning the head so that the disc's face is horizontal. The small drum sander has the sandpaper backed by a foam-like material which allows for fluctuation and an uneven scarf. Bob Bready agrees and uses the disc (with appropriate jig). Also the DeWalt radial arm mounts a bit at the back end (much as for the drum sander you mention) and if the wall against which the saw is set is over 26' wide, it would be used for the main wing spar drilling...a horizontal borer. There are radial arm saws and radial arm saws...all are not equal with respect to function possible and quality, the latter having a lot to do with the accuracy. My DeWalt is twenty years old-the original radial arm. Even those now called "DeWalt" are not the quality of old. I think B&D bought them out. As for Sears, I never buy anything from them with moving parts! Excellent suggestion in one of your newsletters on a small sander. I bought the Skil "Sand-Cat" and it is just great for the sculpturing of the spars, tips and so on. Very light, and does not tire the hand.
John Devoe
|
From "Construction Notes" Falco Builders Letter, December 1986 |
Let's talk scarfing techniques. After all, the scarf joint is the most common joint in the airplane, and I'm interested in the variety of methods our builders use.
Steve Bachnak uses a sanding drum which he has mounted on an old table saw. The sanding drum is installed on a shaft which is mounted on the table top with two pillow block bearings, which have been shimmed to the slight incline needed. Steve used the motor from the table saw, driving the shaft with a belt and pulleys on the shaft and motor. Steve scarfs almost all of the plywood ahead of time. If he must glue the plywood on first, he uses a block plane and a sanding block to make the scarf joint.
Steve Bachnak also mentioned that he prefers to cut all of his plywood using a straight edge and a Stanley utility knife. He simply marks the plywood, holds the straight edge in position and makes a couple of passes with the knife. The edge is smooth and straight-better than he can do on a saw and also easier than firing up the bandsaw or table saw.
Jim Slaton scarfs all of his plywood by hand using a pneumatic die grinder and a Sears 2-1/4"Ø x 1" x 1/4" shaft sanding drum. Jim started out using a hand electric drill but found it was too slow, and he likes the adjustable speed of the pneumatic tool. Jim works with the plywood on the edge of the work table. He marks the start of the scarf with a pencil and then carefully sands the scarf with the die grinder-one disadvantage is that he gets a lot of sanding dust in his eyes-and then he finishes off the scarf with a sanding block. Jim started to make a scarfing jig on the radial arm saw, but ended up using the die grinder method and found it so easy he never completed the scarfing jig, although he's thinking about finishing it before working on the wing.
Dave MacMurray uses a Milwaukee electric die grinder, but he admits to ruining a couple of sheets of plywood. One of the problems with an electric die grinder is that you can't adjust the speed of the thing-it either spins at 30,000 RPMs or not at all.
|
From "Construction Notes" Falco Builders Letter, December 1986 |
Francis Dahlman has been keeping an eye on Adam Slobowy and the Falco he is building in Chicago. He was intrigued to see that one of the first things that Adam did was to build a work table, cut a hole in the middle of it and mount a belt sander upside down. The belt is just a tad higher than the work table, and Adam uses this to sand spars to contour.
|
October 1998 |
I have been reading articles in the SkunkWorks area (great job) and I had a question on wing skins. All articles focus on clamping methods and neglect to mention if they are using clamps exclusively or in conjunction with the old pneumatic stapler. Is the damage that the staples do to the ribs significant? What about sufficient clamping pressure with resorcinol glue?
Rick Fitzwater
RBFalco@aol.com
Staples are so small, they really don't hurt the wood. I can't say if staples give you sufficient clamping pressure with resorcinol, but I'll ask others for their comments.
Alfred
|
From "Construction Notes" Falco Builders Letter, December 2001 |
Walter Monk asks about the grain direction of the spruce in used in making the various spars, capstrips and longerons. He has read in a book that flat-grain wood is sometimes considered superior and more desirable that cross-grain wood. By flat-grain, he means that the grain of the wood would be parallel to the wing skin, when you looked at it in cross-section, rather than roughly perpendicular in the case of cross-grain.
From a design standpoint, it is fine to have the grain as cross-grain or flat-grain. As a practical matter, you have no choice since all spruce is supplied as quarter-sawn wood, and is therefore cross-grain always. That's what we use. For the rib capstrips and longerons, either way is fine. It makes so little difference, I don't think it's worth a moment's thought.-Scoti
|
|
![]()