Weebee Air Force
Doubles in Size
![]()
Weebee Air Force
|
|
|
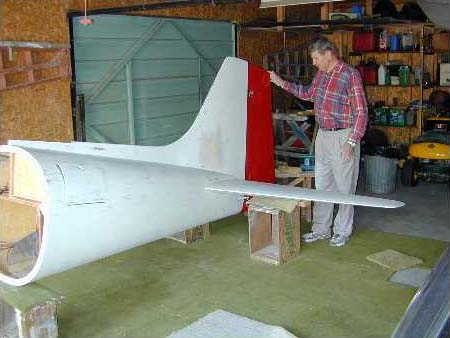
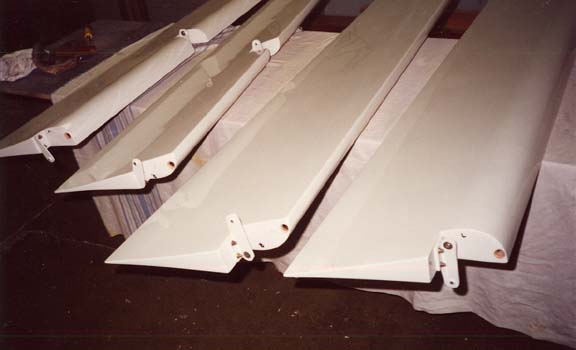
The red tail is the only Ferrari red part the
airplane ever saw. |
The History: With Falco
So finally we come to the Falco, which may never have occurred
except for one strange event. In the mid 80's while building the
second Emeraude, we started to see pictures of the Sequoia Falco,
and put a few up on the wall of the workshop. As probably the
most active aircraft manufacturing facility in Canada at the time
(just kidding, DeHavilland), many people came through Dad's shop.
All were impressed with the construction of an airplane as complex
as an Emeraude, and equally impressed with the pictures of this
thing called a Falco. The answer to their questions was always
the same. "That's a Falco. It's probably the only wooden
aircraft tougher to build than an Emeraude. Maybe someday, but
not likely."
At an EAA chapter meeting one day, a new face asked if anyone could provide him advice on building a metal aircraft. Dad was by now building the Rebel, and invited him to the shop. The stranger asked the same question about the Falco pictures on the wall, and got the standard answer. We learned the stranger's name. Don Adamo visited us a few times, looking for advice and admiring both the Rebel project and the flying Emeraude. Then one Saturday morning he drove in, towing a trailer on which rested the unmistakable bulkheads of a Falco fuselage, loosely held together with stringers.
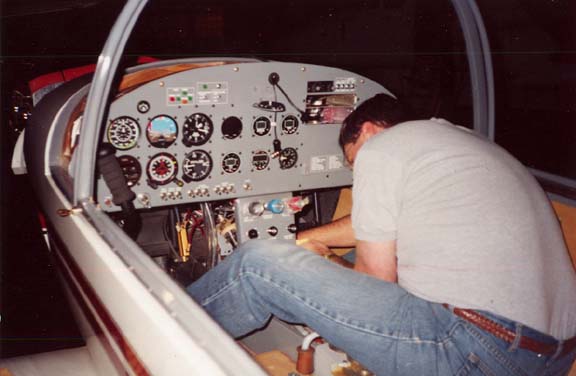
|
Mike installs the panel. |
As Dad and I stood there with our mouths open, Don explained. Soon after they became available, Don bought Falco plans from Sequoia and started construction. After a while, he realized that the construction of a Falco wasn't what he wanted to do. Sometime in the middle, he and his wife divorced, and the Falco parts lay in a barn under his wife's control. Given the circumstances of the breakup, Don knew he'd never see any benefit from them, and essentially forgot they existed. He set out to build a simpler metal airplane. However, after meeting Dad, seeing his workmanship and seeing the pictures on the wall of the shop, Don called his ex-wife. He told her that he had a way to see the project put to good use, but without benefiting from it personally. She agreed to let him take it away. Don's kickstart contribution is the reason that we test flew two Falcos on May 18th.
Dad and I must have glazed over about this point, because Don snapped his fingers and said "Well, do ya want the damned thing or do I hafta set fire to it in your driveway!" It was in the shop in one minute flat.
It lay there for two years. Oh sure, we read eight years of newsletters, pulled out some staples and cleaned up a little varnish, but not much else. Despite Don's impetus, neither Dad nor I was sure that we really wanted to undertake the project. Given the value of the Canadian dollar and the inherent cheapness of us as homebuilt aircraft people, we knew that it'd have to be scratch-built. The time-and still the money-would be a drain.
I think the turning point was Lee Anne. My father does great construction work, but (God love him) he's a cheap S.O.B. when it comes to making the project look good. I think he constructed his first five airplanes without using a piece of avionics built after 1950. (Typical Falco construction conversation: "But Michael, it's a new part!" "Yes Dad, but it's a new war-surplus part. And I don't know if it's a war in which airplanes were even used.").
Having experienced a couple of Team Wiebe airplanes, Lee Anne simply put her foot down one day. She said that she was sick of all this discussion on building a Falco; and that if we had been building instead of discussing we'd be half done by now; and that if we were going to do it, we should at least not be so damned cheap on the interior and instrument panel! I could have kissed her. Except that I was too busy ordering avionics catalogues from Spruce, Wicks, Chief, etc. The project was a go! Oh yeah, and we did register and order fresh plans from Sequoia.
The Plane
So we jigged her up. Since we had fuselage parts, we jigged up
the fuselage. Reality check time. Don Adamo will always be the
reason we undertook this project. But dammit Don-couldn't you
have at least built it straight? We spent the first month trying
to reconcile plans with reality. In the end it worked out, and
in fairness to Don, the issue was not his workmanship. It was
the typical frustration of trying to take over someone else's
work part way through a project. Having said that, a scapegoat
is always nice. Our airplane turned out left wing heavy-a situation
that will forever be known as the Adamo roll.
With most of the fuselage skinned and the basic wing structure in place, we cut off the tail and put it aside. This gave us a short-enough section of fuselage that we could finish construction of the wing. We chose to build horizontally, mainly because it saved us having to raise the roof or lower the earth. In retrospect, if you have some experience with wood construction and jigging, I don't think it matters. However, building the wing vertically first, then adding the fuselage horizontally seems to provide the most likely chance of getting it straight.
|
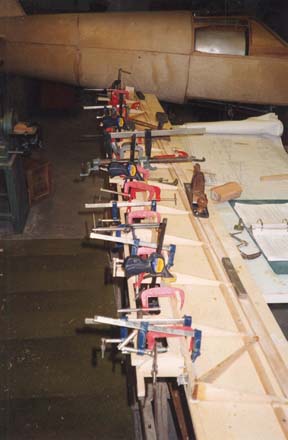
Flaperon clamps. You can never have too many
clamps when building a Falco. |
By the way, much of the fuselage plywood was glued on dry without worrying about compound curves. Patience and good steady gluing pressure are key. I don't remember if this is in the plans, but one trick to help with this, or any glue joint, is to cut scrap strips of plywood an inch wide. Then drive brass brads or staples through the inch wide strip, through the ply skin, into the structure underneath. When it's all dry, work on removing the plywood strip and all the mechanical fasteners come with it. Waxed paper under the plywood strip ensures that glue seeping out of a joint doesn't stick the plywood strip down to the finished aircraft.
We chose West System epoxy because we were lazy. Two of the previous four wooden aircraft were built with Aerolite, the other two with epoxy. No magic reason on the Falco. We simply considered all the issues of mixing components, masking and varnishing surfaces, etc., and the epoxy just seemed easier. Without re-opening religious discussions, we did initially paint the rudder red and test it for temperature with a laser temperature measuring device on a hot sunny day. At 80 degrees ambient, the white surface measured 98 degrees. The red surface was a little over 140. We painted the plane white.
Finishing the airplane took some time, and even then we didn't get it quite right. We didn't "chase" the humidity in terms of filling low spots, which was a good thing. But we did use two different density fillers-one for 'big' jobs and one for pinholes and scratches. Sanding to a smooth finish across two different densities of filler is a pain in the butt, and there are a couple spots where it shows. The solution is simple-use one fill method (or at least make the final finish all one method). One neat thing we did do is use a roll-on pre-paint water-based "primer". This simple method allowed us to fill and sand right to the final paint stage in our low tech shop. For paint, we chose Dupont Imron 6000, which is actually a new polyurethane base/clear system, not the traditional one-coat polyurethane that everyone thinks of when they think Imron. It's a great paint, giving tremendous depth to the finish. But like any base/clear system, it exaggerates the effect of any surface imperfections.
|
Aileron and flap counterbalance Note holes in ends. Ready to accept 4130 pipe filled with appropriate amount of lead for counterweighting. Glued in place, with flange on end, screwed to end rib. |
We chose the standard canopy because we're both six feet tall. In the end, we bought the canopy glass bubble, the cowling, and the nose gear casting. Oh yeah, the gas tanks and main gear shocks are real Falco, but came third-hand from an estate sale. Everything else was scratch built.
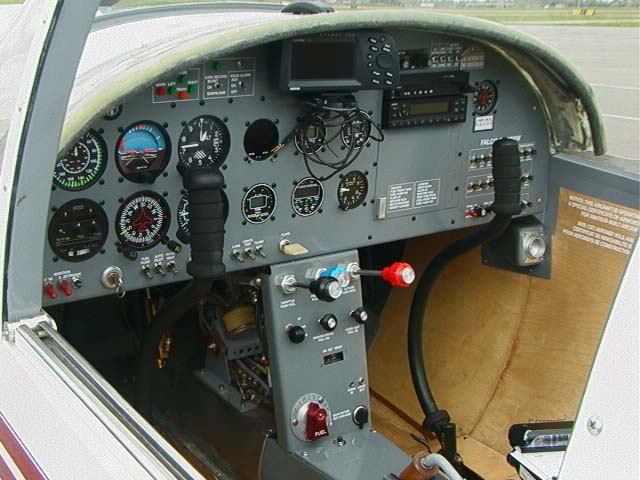
The panel includes a gaggle of Electronics International engine monitoring instruments, interconnected to various systems. For example, we have their 'black box' wired to collect four cylinders of EGT & CHT, RPM, MP, fuel pressure, oil temp and pressure, etc., continuously. I download it to my laptop for analysis. We also have a voice warning system that tells us if any engine parameter, fuel level or timer triggers an alarm, the limits of which we have preset. This system is hooked into the landing gear, so that if we don't put the gear down when we're supposed to, a beep and a gentle voice overrides into the headset with the message "check landing gear". This is in addition to the normal visual warnings. If you're going to have bells and whistles, active systems monitoring is the reason to have it.
The panel is good VFR with a UPS Technologies comm, Garmin digital transponder and Garmin 295 color GPS. Having the panel removable is a very important part of the Falco design, and we needed to preserve it even with our scratch-built philosophy. We included a Navaid single axis autopilot (a hand-me-down from Jim Petty's Falco) and the Porcine Associates connector to mate it to the GPS.
Here's an interesting mod that turned out to be simple and effective. A local homebuilder had tested special order 12VDC narrow beam kitchen halogen bulbs for longevity and weather resistance with good results. So we mounted two of them in place of the single bulb in the cowling. With the addition of a $35 police car headlight flasher, we now have two bulbs that will shine steadily, 'wig wag' flash for recognition, or any combination in between.
The engine is a 180 hp IO-360-B1E, built by Bart Lalonde at Aerosport Power in British Columbia, Canada. Aerosport Power is the uncertified portion of a certified engine shop, and Bart builds a lot of engines for RV drivers. I would strongly encourage Falco builders to check him out. We specified an engine with all new parts, except for a first-run case and an overhauled fuel injection servo and spider. He was very cost effective.
We chose to use one electronic ignition and one magneto. Since we used an impulse mag, we can start on either system. However, so far our experience suggests that the hotter spark of the Jeff Rose electronic ignition eliminates most of the hassles associated with starting an injected engine-hot or cold. RPM drop running only on the magneto is about 100, while the electronic only shows a drop of ten to twenty RPM. As long as the electronic is running, the mag might as well not be there.
![]()
![]()
|
|
Go back to Jack & Mike Wiebe