|
Vanishing Point Tools The vanishing points are 'named' the Left Vanishing Point, Right Vanishing Point and Bottom Vanishing Point, without regard to where they are located. In the dialog for the vanishing point tools, you set whether the PerpectiveTools palette operates in one-, two-, or three-point perspective.
One-point perspective uses the Left Vanishing Point.
Two-point perspective uses the Left and Right Vanishing Points.
Three-point perspective uses all three vanishing points. You may use these tools to set the vanishing points at any time, and you may set any of the three vanishing points, even if you are not using them in the current perspective drawing mode. In other words, you may set the Bottom Vanishing Point, even if you are in one-point perspective mode, which does not use that vanishing point. The vanishing points may be off the page. They are stored in your drawing, but they are not visible objects. To set a vanishing point, select the appropriate vanishing point tool:
Once you have selected the vanishing points, and set the tools to one-, two-, or three-point perspective drawing, you may use any of the tools to draw in perspective. Because of the nature of perspective drawings, you cannot tab into the Edit Window with these tools.
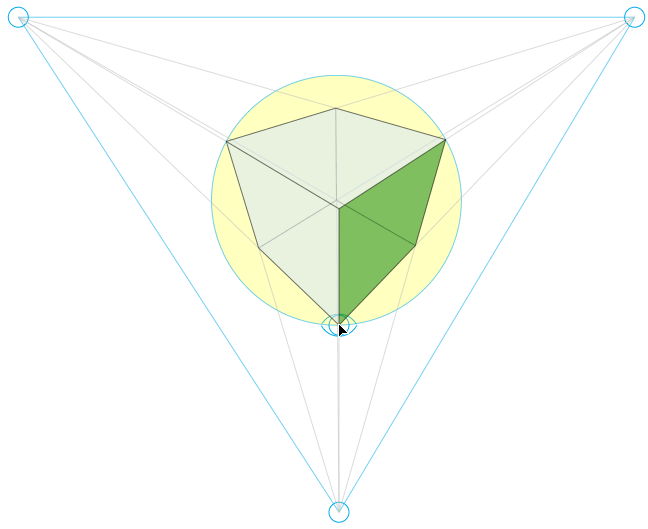
Setting the Station Point The large circle shown in the display in the lens circle, which is where the cone of view hits the picture plane. You should plan your drawing within the lens circle for the least amount of distortion. In one-point perspective, the station point is the distance of the viewer's eye to the picture plane. Drag the station point down to increase the distance from the picture plane, drag up to decrease the distance. You may tab into the Edit Window to set the distance to the picture plane. In two-point perspective, the station point is defined by the plan angle and you can drag it along a semi-circle below or above the horizon line. You may tab into the Edit Window to set the plan angle. In three-point perspective, the station point is defined by the location of the three vanishing points. You can move the station point by dragging it along the semi-circle below or above the horizon line. The vertical vanishing point is constrained to a move that is perpendicular from the horizon, however you may press the Shift key to move the vertical vanishing point left or right. You may also drag the point on the tip of the cube to change the perspective view. Vanishing Point Dump
Vanishing points, station point and lens circle. This example is for a two-point perspective drawing. |
![]()
Go back to WildTools