|
|
The Polygon tool is a Draw/Reshape tool, which means that it can reshape-or edit-existing polygons and parallel polygons.
The Polygon tool has a reshape-as-you-draw capability that lets you reshape a polygon as you draw it. Click in the wrong place? No problem. Now there are handles at each new point in the polygon, and you just click in a handle to move the point. It takes, oh... about five seconds to learn.
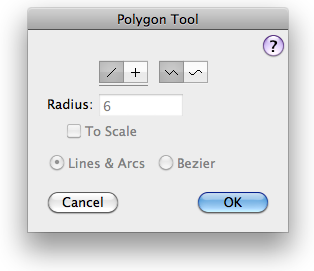
In the tool's dialog, choose whether the tool will be constrained (cross) or unconstrained (diagonal line) to snap angles. Choose if you want rounded corners, and if so, the radius size and whether the object is to be placed as a group of lines and arcs, or as a single Bézier. To draw a polygon, place the cursor in the drawing area where you want to start the polygon. Press the mouse button. Move the cursor to the end of the first side. Release the mouse button. To add another leg to the polygon, move the cursor to the end of the next side and click. Repeat this step to add as many sides as you wish. Click in the same place twice or press the Enter key to stop drawing. To create a closed polygon, move the cursor to the original starting point. When you reach this point, you will hear a 'click' sound from the computer. Click at this point. Reshaping Polygons with the Polygon Tool To do this, press and hold down the Option key. The cursor will change to an Arrow cursor. Click on the object in the drawing. If you click on a line or rectangle, it will be converted to a polygon. When an object is converted, you will hear a distinctive sound from the computer.
The object will be redrawn on the screen as a 'ghosted' object. You are now in the reshape mode, and you may now engage in four operations: selecting handles, drawing, dragging and adding points. You may press the Enter key at any time to get out of the reshape mode. You may zoom in and out (if Zoomer is turned on) with the normal Zoomer actions and the usual command keys for Reduce to Fit, Normal Size, etc. Converting Objects to a Polygon
In the tool's dialog:
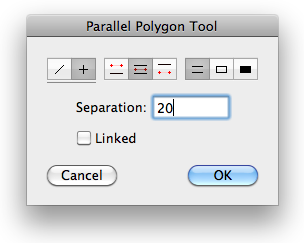
Choose whether the tool will be constrained (cross) or unconstrained (diagonal line) to snap angles. Select whether the tool will draw from left, center or right. Select whether the polygon will have open ends, closed ends or closed ends with solid fill. Solid fill means that the fill pattern and fill color will be set to match the pen pattern and pen color of the object. Since this tool is commonly used to trace over double lines to fill a solid wall in architectural drawings, this option saves the extra steps of changing the attributes of the polygon after drawing it. Type the separation of the two lines. Select the Linked option if you want the polygon placed as a Parallel Object. To draw with the tool, use the same drawing method described above for the Polygon tool.
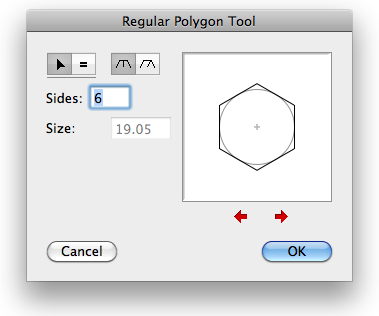
In the tool's dialog, choose whether the tool will draw interactively (arrow) or place a fixed-size polygon (equal sign). Choose whether the polygon will be placed by size (measured across the flats) or by enclosing diameter. Type the number of sides you want. Click on the '<<' and '>>' buttons to adjust the presentation. If you've selected a fixed-size polygon, type the size or diameter. The standard PowerCADD math functions and mixed dimensional units may be used. To place a fixed-size polygon, simply click in the drawing.
To draw a regular polygon interactively, place the cursor in the drawing area at a location that will represent the center of polygon. Press the mouse button. Drag away from the starting point. As you move the mouse, the polygon will expand to follow the mouse. You may press the Option key to toggle the presentation. The presentation is constrained to an angle that makes sense depending on the number of sides for the polygon, however you may press the Shift key to unconstrain it. You may tab into the Edit Window to edit the size or diameter. Release the mouse button to complete the polygon.
With this tool, you draw a polygon as described for the Polygon tool, except that after you draw the first segment, each successive segment will be perpendicular to the last polygon segment.
The polygon created with the Freehand tool is exactly the same type of object created by the Polygon tool-it just has more points-and it can be reshaped and edited like other polygons. |
![]()
Go back to WildTools